Welcome to the World Class Facilities Toolkit!
Several years ago, it was recognized that the planning and tracking of any “world class” construction project must, by definition, contain certain elements. There must be a place for planning documents, progress tracking, and task list management. These features, and more, have all been brought together into the application called, “World Class Facilities Toolkit” (known throughout this document as “the Toolkit”).
The Toolkit Is composed of several modules which all work together to make information easy to add, and just as easy to retrieve. There are four modules, which are known as:
1. The Knowledge Center (KC)
 A place to learn and share in the collective understanding of World-Class medical facility planning, design, operations and care delivery. The Knowledge Center content is continuously growing and evolving. It is a collection of resources that are intended to be shared among users. The resources might be documents, spreadsheets, PowerPoint shows, web links, or any other kind of file you may wish to share. Because these resources are open to the public, they may serve as both a repository of shared information and a tool for training and onboarding people on one’s project team. A place to learn and share in the collective understanding of World-Class medical facility planning, design, operations and care delivery. The Knowledge Center content is continuously growing and evolving. It is a collection of resources that are intended to be shared among users. The resources might be documents, spreadsheets, PowerPoint shows, web links, or any other kind of file you may wish to share. Because these resources are open to the public, they may serve as both a repository of shared information and a tool for training and onboarding people on one’s project team.
2. Project Tool (PT)
 Similar to the Knowledge Center in that the Project Tool is a place to gather and organize information resources. But the Project Tool allows the registered user to organize files and links into separate projects. Within any given project, there is also the ability to further sub-categorize resources into folders. These folders may be used to represent milestones in the life cycle of a project, or they may be used to represent categories of resources, like the folder system on a personal computer. Similar to the Knowledge Center in that the Project Tool is a place to gather and organize information resources. But the Project Tool allows the registered user to organize files and links into separate projects. Within any given project, there is also the ability to further sub-categorize resources into folders. These folders may be used to represent milestones in the life cycle of a project, or they may be used to represent categories of resources, like the folder system on a personal computer.
3. World-Class Checklist
 We all use checklists to help us organize and remember tasks that need to be accomplished. They help keep us on track, and use our time efficiently. That is precisely the purpose of the World Class Checklist Manager. The beauty of a checklist is that it allows the user to visually evaluate the progress of a project, and identify areas that still need work. The World Class Checklist is designed to guide, educate and monitor the progress of your project. We all use checklists to help us organize and remember tasks that need to be accomplished. They help keep us on track, and use our time efficiently. That is precisely the purpose of the World Class Checklist Manager. The beauty of a checklist is that it allows the user to visually evaluate the progress of a project, and identify areas that still need work. The World Class Checklist is designed to guide, educate and monitor the progress of your project.
4. Capital Investment Decision Model (CIDM)
 The CIDM module allows the management of: The CIDM module allows the management of:
- CIDM Events
- Artifacts
- Archive of historical CIDM data
What Is a Resource?
A resource is information created by a World-Class Facilities Toolkit user that is meant to be shared. It is a generic term used to reference all kinds of information that anyone may store in the Toolkit's information repository.
Two Kinds of Resources
-
File
A file resource may be a Word document, an Excel spreadsheet, a simple text file, or any other kind of file. Generally, documents or spreadsheets are the most common files shared in the Toolkit. For further information on the distinction between the two file icons, see below.
-
URL Link
A web address to important documents or websites. Storing a link in the Toolkit is similar to bookmarking a site in your browser, but provides for sharing the bookmark with other users.
Anatomy of a Resource
There are some basic attributes that a user can easily see just by looking at any of the resource list views throughout the WCF Toolkit.
-
Document ID
This is a unique identifier assigned to a resource when it is uploaded to the Toolkit application. This identifier is important because each resource can be accessed via a unique web address or url in which the document ID is the key identifier to that resource. For example, if the Document ID is 12345, then the resource can be accessed by typing or pasting any of the following URLs into a browser.
For example:
https://facilities.health.mil/Repository/Download/12345
https://facilities.health.mil/Repository/GetFile/12345
https://facilities.health.mil/d/12345
(This last form is known as the "shorthand" or "shortlink" version of the url.)
Users may see each version of the document and its corresponding document ID on the resource’s history page (see "Lock/Unlock" and "History" further down the page).
-
Resource State Icons
Preceding the resource Title, there are two icons, reflecting the lock state and the resource type. See the comprehensive list below for explanations of all icons used in relation to resources.
-
Title
Users may give a resource a descriptive name. By default this will be set to the file name or the url of the resource, but it can be changed to any descriptive name by Toolkit users who have the proper access.
When viewing a list of resource, you can roll your mouse pointer over the title to see a popup displaying information about the file. This information will include the Filename (if the resource is a file), Author, Resource Type, Size, and Latest Available Version of the Resource.
-
Details magnifying glass*
By clicking on the magnifying glass following the resource title, users can see a detailed view showing all of the resource’s attributes.
-
Lightning Bolt Icon*
By clicking on the lightning bolt, users can see a small popup containing the shorthand version of the Resource URL that can be copied onto the clipboard.
*In addition to these icons, there are other symbols used to convey information about a resource. You may find these listed below.
-
Role
Each resource is assigned an access role for security purposes. For more information on how Role privileges work please see the security section.
-
Project
Some resources are stored in a specific project within the Project Tool. This is a reference to that resource’s project.
Creating a New Resource
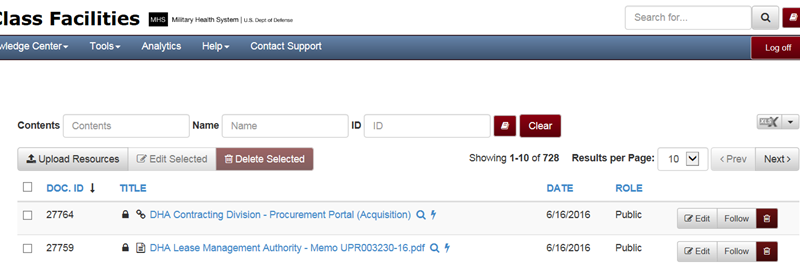
If you want to add a new resource to either the Knowledge Center or to a Project, just click on the appropriate upload button at the top of the page.
In the Knowledge Center, this button will be clearly marked as "Upload Resources". (Note the use of the plural—the WCF Toolkit allows you to upload multiple resources at the same time.)

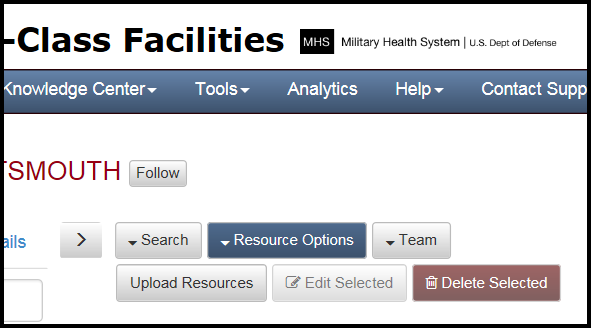
If you are working within a Project, there is an extra step involved. On the button bar containing buttons for "Search", "Resource Options, and "Team", click on the "Resource Options" button." This will reveal a second row of buttons, which will include the option to "Upload Resources".

In either the Knowledge Center or the Project view, clicking the button for "Upload Resources" will bring up a modal window with the necessary options to load one or more resource files to either the Knowledge Center Repository or the Project currently being viewed. That dialog box will look like one of these:
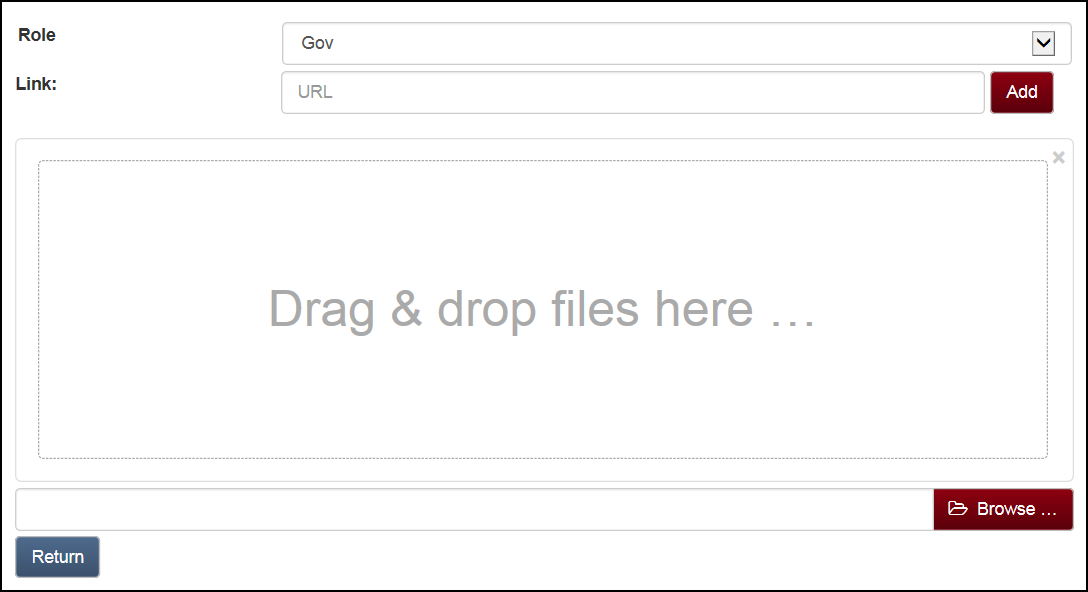 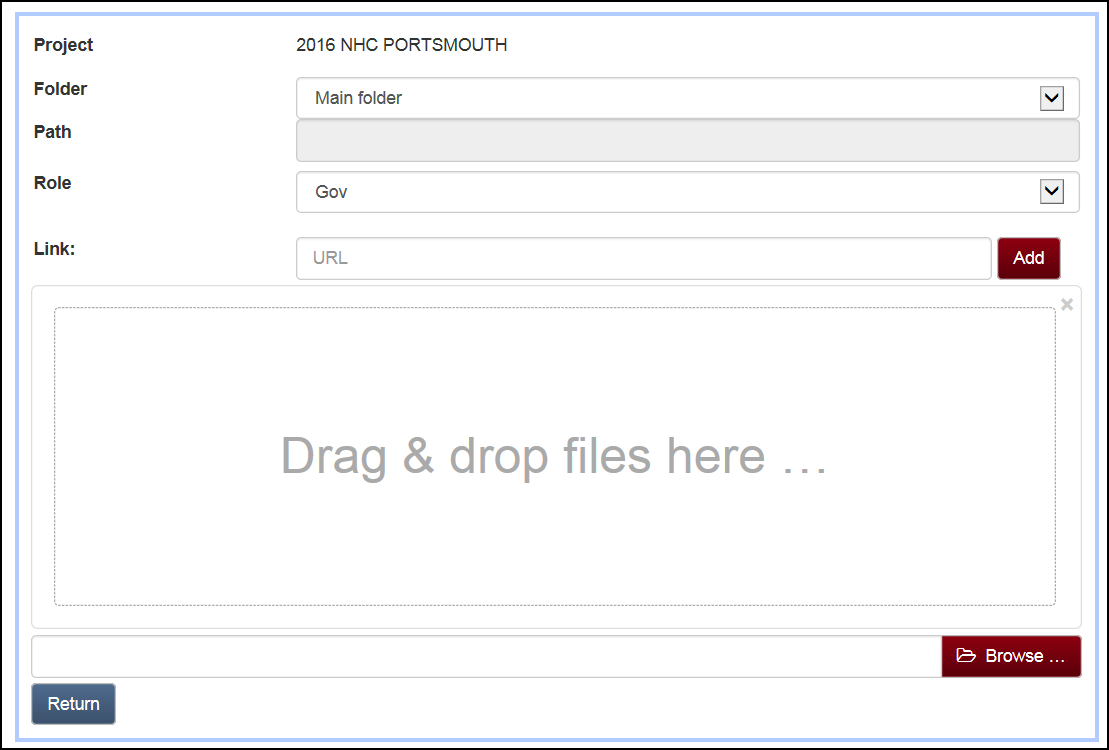
As you can see, the main difference between the two dialog boxes lies in the presence or absence of the "Project" and "Folder/Path" fields.
Creating a File
In order to include a file in your upload, you can either drag-and-drop files from your file explorer, or browse to them by clicking the "Browse" button.
There is a file size limit of 250MB, meaning that files larger than 250MB will not be allowed to be uploaded to the Toolkit.
Creating a Link
A resource may be a link to another website or other external document or resource. For example if there is an article or white paper published on another agency site with pertinent information, Toolkit users may paste the url into the “Link” text box. This will then serve as a redirect to that url.
Note: This does not automatically grant the user access to that linked resource if there is any form of security authentication or registration requirement on the targeted resource.
Deleting a Resource
If you have sufficient privileges to delete a Resource, you will see a button with a picture of a trash can at the right end of the row. Simply click on that button to initiate the process. You will be presented with a verification dialog to ensure you did not click on the button by accident. The dialog box will look something like this:
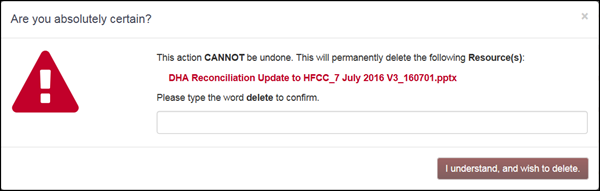
Type the word "delete" into the text box (it isn't case-sensitive), then click on the button saying "I understand, and wish to delete." You will be returned to the list screen you were just viewing, and there will be a message at the top of the page providing a status of whether the deletion attempt was successful, or not.
Editing the Resource
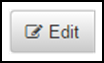
If you are a registered user of the WCToolkit, and have sufficient permissions to edit information about a specific resource, you will see a button labeled "Edit" at the right end of the resource listing. If you don't have sufficient permissions, you won't see the button at all.
Once you have sufficient privileges to edit a particular resource, and the button is visible, clicking on that button from either the Knowledge Center or a Project view will take you to a screen where you can edit the detail information relating to a resource.
Most of the editable fields will be fairly self-explanatory. But there is a group of buttons whose purpose may not be immediately obvious.
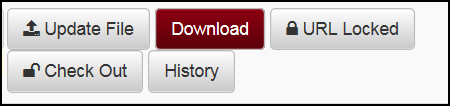
These buttons accomplish the following purposes:
-
Update File
Allows you to upload a completely new version of the original file. It can be as similar or as different as you like.
-
Download
If the resource is a file, this button will initiate a download of the file through your web browser.
-
URL Locked/Unlocked
When a resource is first uploaded it is given a unique Document ID. This ID is used to reference the resource in a url. It is possible "lock" the url so that the original ID will always point to the newest version of the resource.
IMPORTANT: Locking a Resource ID allows the preservation of all iterations, or versions, of a resource. When a resource is "locked", the latest version will always be assigned the master Document ID, and the previous version will be saved with a new ID. This allows the user to access all versions in the history of the document, with the newest version always having the original ID.
-
Check In/Out
Like a book or CD at the library, you can "Check Out" resources from the World-Class Project Tool. This allows you to modify the contents of the resource without fear that someone else will make changes while you are working by preventing anyone else from uploading a new version of the document.
When you have completed your changes, you can simply re-upload your changed file using the "Update File" button, and the WCF Toolkit will save your updates as a new version of the document. You must then “Check In” the resource to allow other users to upload new versions.
-
History
Here, you can find a list of all the versions of a document, including:
You can also select any version of the resource for editing or downloading.
Resource Details (Attributes)
Each resource has a number of associated fields known as "attributes". Attributes represent unique pieces of information about the resource. When viewing table lists of resources, most of these data elements can be used to help identify and select a unique resource, using them as either search criteria or filters.
Attributes can be viewed and/or edited through a variety of methods, which are defined earlier on this page.
The attributes available for any given resource include:
-
ID
The Resource ID. This value is fixed once the resource is loaded into the system, and can be used to track the resource throughout its life cycle.
-
Abstract
A summary of the contents and purpose served by the resource.
-
Author
The originator of the document, the original creator.
-
Category
A broad description of the type of material contained in the resource. E.g., Guidance, Policy, Article, Images, Site Plans, etc.
-
Comments
Remarks on the material contained in the resource.
-
File Name
The actual name of the file that was uploaded, if it is a file resource.
-
File Size
The file size of the resource, if it is a file resource.
-
Folder
If the Resource is part of a Project, then it may be contained in a sub-folder within the project. If so, this field will show which folder contains the resource.
-
Indexed in Knowledge Center
Resources that were originally uploaded to a specific project may optionally be shown to the public in the Knowledge Center. By enabling this option any user with the proper role level will be able to access this resource and see it listed in the Knowledge Center.
-
Item Locked
Shows whether the resource URL has been locked, or not.
-
Keywords
Any desired terms may be associated with the resource in order to help facilitate finding it later.
-
Last Updated
Date and Time the resource was last modified.
-
Name/Title
By default, this will have the same value as the "Filename" or "URL". However, it is possible to change this value to something more user-friendly.
-
Project Document Type
Which stage the resource pertains to in the life cycle of the project.
-
Project
If the resource is part of a project, the name and numeric ID of the project will be displayed here.
-
Publish Date
Publication Date of the resource.
-
Publisher Type
Identifies the domain of the publisher, whether it is Academia, Government, Industry, Research, etc.
-
Publisher
Name of the publisher of the resource.
-
Resource Type
Used to identify whether a resource is a physical file or document, as opposed to a URL link to an external online document.
-
Role
Part of the security apparatus of the World-Class Project Tool, the User Role indicates what type of user is allowed to view/edit a resource. For more information on how Resource security works please see the security page.
-
Topics
There are several topics defined within the World-Class Facilities Toolkit which can be assigned, providing yet another means of identifying and tracking a resource.
-
Uploaded By
Identifies the user who originally uploaded a resource to the Toolkit.
-
Version
The World-Class Facilities Toolkit tracks each version of a document, and allows users to select which version s/he would like to view/edit.
Informational Icons
There are a variety of places throughout the Toolkit application where symbols are used to help communicate information about a resource, or an action that can be taken on a resource. Sometimes these symbols are simply shown next to the resource information, and sometimes they are part of the text on a command button.
Resource Type
-
Resource is a computer file. It is indexed in the WCF Toolkit, meaning it can be located by searching for values within its contents.
Resource is a computer file, but it is NOT indexed within the application. Some files do not contain text, and cannot be meaningfully indexed—this largely applies to images and other sorts of binary files. Additionally, very large files (greater than 50Mb in size) are not indexed.
-
Resource contains a URL Link.
Resource Availability
-
Resource is locked, meaning the URL is fixed, and will always point to the most recent version of a resource.
-
Resource is unlocked, and each version will be accessed by its own unique identification number.
-
Resource is checked out by another Toolkit user.
-
In the Knowledge Center, the flask indicates that the resource is visible to the Knowledge Center, but belongs to a project within the Toolkit.
-
When viewing resources in the context of a project, the graduation cap indicates that the resource is also visible in the Knowledge Center.
Additional Information
-
Takes you to a page displaying all the information available about the resource.
-
Clicking on this icon will display a "shortlink" to the resource that you can copy and share with others. You must click on the icon again to close the popup window.
Command Buttons
-
Edit the current resource.
-
Delete the current resource.
-
Update/upload a new version of the current resource.
Multi-Edit Resource Feature
The Toolkit allows users to edit more than one resource at a time through it’s multi-edit resource feature.
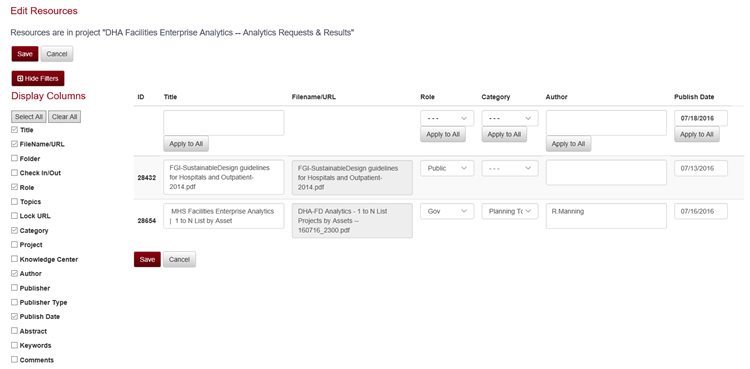
Each resource list view features a preceding checkbox next to each resource. Check the box for each of the resources that you wish to edit, then click the "Edit Resources" button at the top of the resource list. You will then be directed to the "Multi-Edit Resource" screen. This page allows you to set values that are common to multiple resources with a single edit, if desired. This screen also allows the review and comparison of multiple resources.
-
Attribute Selector
On the left margin of the screen is a list of all of the editable attributes for resources. Check and uncheck these boxes to turn the columns displayed on and off.
-
Top Row of Table
Across the top are all of the selected attributes from the list on the left. Noptice that many of them contain edit fields. This allows you to set the value of that column for all the resources currently listed.
Important: Don't forget to click the "Apply to All" button under the edit box. If you don't, the changes won't be preserved when the page is closed.
-
Resource Table
The rest of the screen is a list of all of the resources with the selected attributes showing.
When you are done making changes to the selected resources on the page, click the "Save" button to save your changes and return to the previous screen (either the Knowledge Center or the Project View), or click "Cancel" to leave the page without saving your changes, and go back to the previous screen.
Searching within the World-Class Facilities Toolkit
The purpose of the World-Class Facilities Toolkit is to provide a methodology and a storage repository of record that will allow you to more easily manage large projects. This results in a need for the ability to quickly identify selected information out of the many thousands of records in the system. In order to meet the needs of our users, the search feature within the Toolkit has been enhanced and expanded, making it easier to find desired information.
Global Search
 First, and foremost, there is the global search bar. Located at the upper-right corner of the page, this simple text box gives you the ability to locate information throughout the system. First, and foremost, there is the global search bar. Located at the upper-right corner of the page, this simple text box gives you the ability to locate information throughout the system.
- Global Search—Resources
You can find any selected content in either the title or the body of any resource that is available to you. This means that you must have permission to access the resource before it can show up in a result set for your search. For further information about how security works within the Toolkit, see the Security page.
- Global Search—Toolkit Page Content
The Toolkit application employs both static and dynamic pages. Static pages tend to contain notices, instructions, and similar fixed information that doesn't change very often. Dynamic pages contain data on projects and resources that has been entered by our users. Starting from that same common search bar at the upper-right corner of the page, you can find page content that is part of the Toolkit site, but not part of any specific resource in the database.
Within a Resource Listing
While browsing a list of resources, you can look for items that are visible to you within either the Knowledge Center/Repository, or within the listings of project-related resources.
A Little More Detail
The searches all work the same way, accepting the same kinds of parameters. The difference lies in where you enter the criteria for your search. When finding a resource within either the Knowledge Center or a Project, you will be presented with a number of fields in the header section of the page, allowing you to enter the text you want to find.
These search critertia fields can look imposing, because there are so many of them, especially on the Project pages. But using these search fields is just a matter of filling in the value that will match the same column of the item you wish to find. This is called "query by example". If you want to find a document called "2020 Growth Projections", just type that text in the "Title" field. If you need a Project called "Projected Floor Plans", enter that text in the "Name" field on the Project list page.
For each type of search, there are some important key fields that are commonly used.

Resources
-
Resource ID
These values consist of only numbers, and will take you directly to the desired item.
-
Title
These values can contain any desired value that may have been assigned to the resource.
-
Content
Unique to file resources, the Content field allows you to locate a resource based on a piece of text contained in the document. So, if you want to find a document containing the text, "This is going to be a long story", just enter that value into the Content search field.
More information about Resource fields can be found on the "Resource" tab of this page.

Projects
If you are on a page listing Projects, the search criteria fields can become a bit more intimidating. To help you get accustomed to picking out the key fields on the screen, we recommend you begin by focusing on:
-
Project ID
These values consist of only numbers, and will take you directly to the desired project.
-
Project Name
These values can contain any desired value that may have been assigned to a project.
-
Purpose
There are two possible values from which to choose. You may search for either:
MHS Contract Support, or
MHS Facility
-
Project Status
All projects have one of tw statuses:
Open, or
Closed
-
Assignment Status
This dropdown control allows you to search for projects that are assigned, or not assigned.
The Global Search
The global search feature is based on the input box at the upper left corner of the screen. By entering a value in that box, you can find any resource that is visible to you within the projects and resources that are stored in the Toolkit. In addition, you will be given the opportunity to find content that is part of the Toolkit application, itself. This will allow you to find, for instance, the instructions contained on this page.
The dual nature of this search bar can be seen in how the search results are presented. You will initially be presented with a list of documents, and a button will be displayed saying, “Search the World Class Facilities Webpages”.

Clicking this button will initiate the search for web content within the Toolkit application.
Allowable Search Values
The search capability of the World-Class Facilities Toolkit is highly sophisticated, and can accept a wide range of criteria.
- Numbers vs. Strings
Some fields, like Project ID and Resource ID, will only allow you to search for numeric values. Anything else will simply return nothing, since all ID values are numbers.
Text fields, however, can accept a wide range of values.
- Simple Exact Matches
This is what you use when you want to find a specific word. For example, all resources that mention the word "facility".
- Multiple Words in a Document
Sometimes you are certain of several keywords mentioned in the body of a document, but you cannot recall the exact phrasing used. In that case, simply enter all the words you can remember. The Toolkit will find all the resources that use all those words.
Note that the more unique the keywords you use, the more precise your search results will be. Entering "a the to and" would not be at all helpful!
- Multi-word Phrase
Suppose you want to find the phrase, "as specified by the DoD". All you have to do is enter the words you want, and surround them with quote marks. This tells the Toolkit to find exactly the phrase you entered.
Need More Sophisticated Options?
Everywhere you have the option to enter search text, you will also see a button that looks like this:
Clicking this button will provide you with a detailed explanation of all the search options available to you.
Briefly, all the usual wildcard characters like "*" and "?" will work in Toolkit searches. In addition, you can use logical words like "AND" and "OR", if necessary.
Recommended Browsers
The most common internet browsers are Microsoft Internet Explorer, Google Chrome, and Mozilla Firefox. The World-Class Facilities Toolkit site has been designed for optimum performance and viewing experience in the latest versions of any of these. Other browsers or older versions of the browsers listed above may have difficulty rendering certain pages correctly or as intended.
Navigating the Toolkit
Navigation throught the Toolkit site is accomplished through a combinations of menu bars locateed at the top and bottom of the page, and on-page links provided in the immediate context of the information.
The top navigation bar is organized according to the primary functions of the Toolkit—Knowledge Center; the three tools, containing Checklist, Project, and CIDM; and the Analytics page. To the right side of the menu, there are links to a Contact Support page, personal account information, and the Log Off function.
The footer offers direct access to policy statements and general information about the site.
Search
A global search feature is available throughout the site, located in the upper right-hand corner of every page
WCF Toolkit Notifications System
The WCF Toolkit has a built in notification system where it allows users to follow specific Projects, Folders, or Resources that they would then receive automated notifications about if a change is made to them. Users have the ability to customize which types of events they want to be notified of as well.
Following Resources
Following a specific resource will notify a user of any of the following events:
-
The file resource has been updated with a new version*
-
The link resource has been changed*
-
The resource has been checked out or checked in
-
The resource has been moved to another folder or project
-
The resource name has been changed
-
The resource’s role has been changed
-
The resource has been deleted*
Following Folders
Following a specific folder will notify a user of any of the following events:
-
A new resource has been created in the folder*
-
The folder’s name has been changed
-
The folder has been moved to another folder
-
The folder has been removed form a Project
Following Projects
Following a specific project will notify a user of any of the following events:
-
A new folder has been added to the project*
-
The project’s name has been changed
-
A new member has been added to the project’s team
-
A project team member’s role has changed
-
A user has been removed from a project’s team
*Default notification setting for all users
How to Follow/Stop Following
It is simple and easy to follow a project, folder, or resource.
Projects
You may follow a project by clicking on the Tools menu in the main navigation and then selecting Project Tool | View Projects. Find the project you wish to follow in the list of projects and then click the “Follow” button on the right side of the project listing. You will then receive a confirmation message. Click “Ok” and then you are officially following a project.
This Follow button is also located on the main project view screen near the top where the Project Title is displayed.
Folders
If you would like to follow a folder then you need to go to the main project view screen and select the folder that you would like to follow. The follow button will be displayed to the right of the selected folder’s name at the top of the resource list. Click the follow button and then click “Ok” on the confirmation message.
Resources
If you would like to follow a specific resource it is the same concept as following projects or folder except you may follow a resource form any screen where you can see a resource list. The easiest and fastest way to follow a resource would be to type the doc ID into the global search field at the top right of any screen on the WCF Toolkit and then click the search button. Once you see the resource listed in the result set you will see the Follow button on the right.
Notification Settings
Users can change their notification settings from the Notification Settings screen located in their profile. These settings determine which event types the system will notify them for all of the items they are following. The screen lays out all of the possible event types with check boxes. In order to receive notifications for each event type the user needs to check the boxes of the desired types and click the “Save” button.
|
|
Documents
The following user guides are available for the World Class Toolkit.
|
|